Using Joysticks
This section is about direct control of the joints via two joysticks. Here, the control signals from the user are converted directly into movements of the robot arm. If you are not interested in direct control via joysticks, you can simply skip this section.
Joystick Test
It makes sense to test each joystick before installation and determine the available range of values. Typically, the joysticks provide values between 0 and 1024 (10 bit resolution).
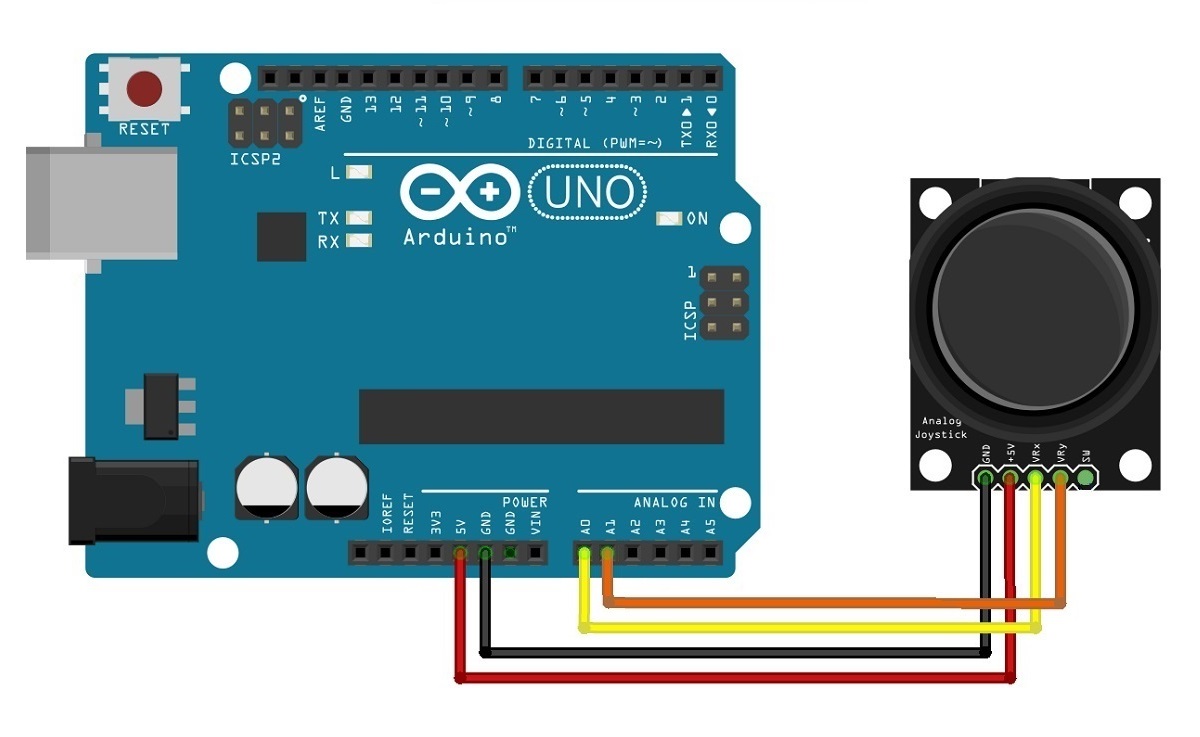
Just connect as follows:
Arduino      Joystick
+5V               +5V
GND               GND
A0                VRx
A1                VRy
/* RobotArm
 * Joystick Test
 * Can be used to check which signals (range) the joystick delivers
 * Stefan Hager 2022
 */

void setup()
{
   Serial.begin(9600);
}

void loop() {
  int xPos = analogRead(A0);  // read analog input pin A0
  int yPos = analogRead(A1);

  Serial.print("X - Axis: ");
  Serial.print(xPos);
  Serial.print("      Y - Axis: ");
  Serial.println(yPos);

  delay(1000);
}
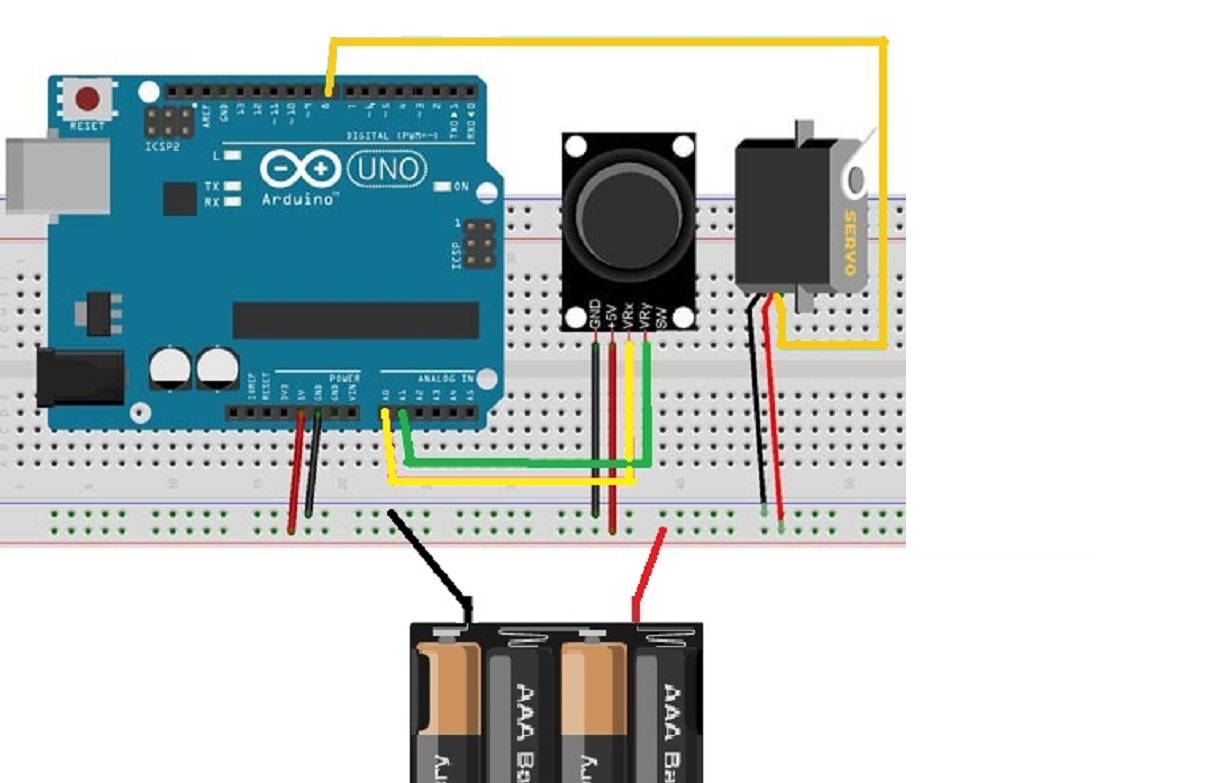
Controlling 1 Servowith a Joystick
Pinout
Arduino           Device
A0                J1 VRx
9                 servo
GND               Battery GND (Important!!!)
/* RobotArm
 * Joystick Servo Control Test
 * Control a servo via joystick
 * Servo uses Pin 8
 * Jostick is on A0
 * Stefan Hager 2022
 */

#include <Servo.h>

Servo myServo;

int position = 90; // current position of the servo
int speed = 2; // change in position = speed of the servo

void setup()
{
   Serial.begin(9600);
   myServo.attach(8);  // connect Servo with PIN 8
   myServo.write(position);
}

void loop()
{
  int joy_input = analogRead(A1);  // read analog input pin A0

  if(joy_input < 400)
  {
    position = position - speed;
    if(position < 0)
    {
      position = 0;
    }
  }
  if(joy_input > 700)
    {
    position = position + speed;
    if(position > 180)
    {
      position = 180;
    }
  }
  myServo.write(position);
  Serial.println(position);
  delay(20);

}
Full Robotarm Control with 2 Joysticks
The following program allows direct control of all axes with two joysticks. In addition, the program outputs the current position of the servos after each movement. Thus you can use these positions later for the programming of automated sequences.
Move the arm over several positions to the desired target position. At each intermediate position, note the values for the individual joints. Later, you can use the program from step 3 to move the arm to specific target positions.
The Complete Setup
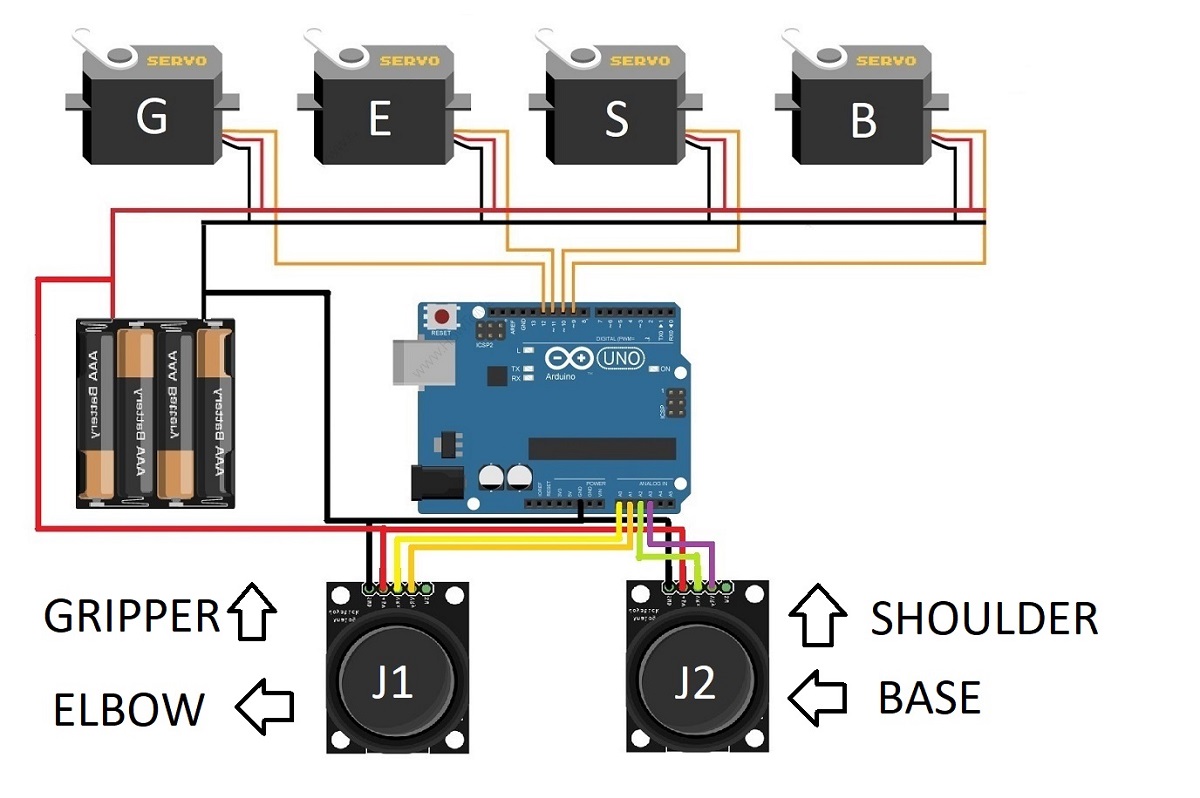
Pinout
Arduino           Device
A0                J1 VRx
A1                J1 VRy
A2                J2 VRx
A3                J2 VRy
9                 Base servo
10                Shoulder servo
11                Elbow servo
12                Gripper servo
GND               Battery GND (Important!!!)
STRATEGY 1: Joystick sets speed
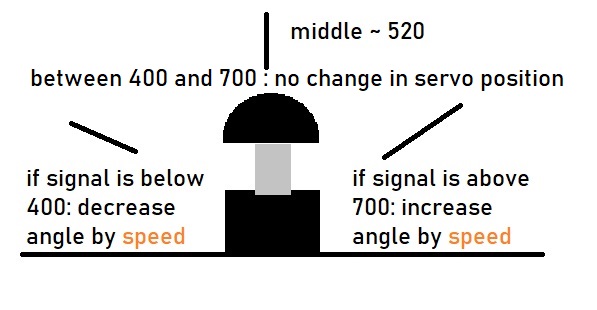
In this strategy, the joystick is used to set the speed for the servo forward or backward. The speed is held as long as the joystick is moved forward or backward in one position. As soon as the joystick is released, the servo remains in the current position.
To keep the implementation simple, a very simple strategy is followed: All values of Joystick that are between 400 and 700 are evaluated as neutral (no User - input). Values above 700 are considered as a movement in one direction, values below 400 as a movement in the other direction. Accordingly, the servo is moved by "speed" in one direction or the other direction.
/* RobotArm
 * Full Joystick Control
 * Stefan Hager 2022
 */

#include <Servo.h>

// any joystick value between LOWER_LIMIT and UPPER_LIMIT is seen as neutral position
#define LOWER_LIMIT 400
#define UPPER_LIMIT 700


// limits
#define LOW_POS 10
#define HIGH_POS 170


// use this define to control speed of the servo movement

// create all required objects from class Servo
Servo base;
Servo shoulder;
Servo elbow;
Servo gripper;

int speed = 2; // change in position = speed of the servo, start with 2, 1 is too low
int outputcounter = 0; // control how often you want to see the servo positions

// ***** make sure that you use the REAL start position! *****
int basePos = 90;
int shoulderPos = 90;
int elbowPos = 90;
int gripperPos = 90;


void setup()
{
  // opens serial port, sets data rate to 9600 bps
  Serial.begin(9600);
  // check if the servos are connected as follows:
  base.attach(9);
  shoulder.attach(10);
  elbow.attach(11);
  gripper.attach(12);

  // set the servos to start positions
  Serial.println("Moving servos into base position ... ");
  base.write(basePos);
  delay(1000);
  shoulder.write(shoulderPos);
  delay(1000);
  elbow.write(elbowPos);
  delay(1000);
  gripper.write(gripperPos);

  Serial.println("Robotarm is ready ... ");
}

void loop()
{
     // check each joystick input and move according joint
     moveBase();
     moveShoulder();
     moveElbow();
     moveGripper();
     delay(20);
     printPositions();
}


// printPositions: prints position of each joint in following oder:
// B: base | S: shoulder | E: elbow | G: gripper

void printPositions()
{
  outputcounter++;
  if(outputcounter < 15)
  {
    return;
  }
  Serial.print("B: ");
  Serial.print(basePos);
  Serial.print(" | S: ");
  Serial.print(shoulderPos);
  Serial.print(" | E: ");
  Serial.print(elbowPos);
  Serial.print(" | G: ");
  Serial.println(gripperPos);
  outputcounter = 0;
}

// control base - servo with A0
void moveBase()
{
  int a0_input = analogRead(A0);  // read analog input pin A0
  if(a0_input < LOWER_LIMIT)
  {
    basePos = basePos - speed;
    if(basePos < LOW_POS)
    {
      basePos = LOW_POS;
    }
  }
  if(a0_input > UPPER_LIMIT)
  {
     basePos = basePos + speed;
     if(basePos > HIGH_POS)
     {
        basePos = HIGH_POS;
     }
  }
  base.write(basePos);
}

// control shoulder - servo with A1
void moveShoulder()
{
  int a1_input = analogRead(A1);  // read analog input pin A0
  if(a1_input < LOWER_LIMIT)
  {
    shoulderPos = shoulderPos - speed;
    if(shoulderPos < LOW_POS)
    {
      shoulderPos = LOW_POS;
    }
  }
  if(a1_input > UPPER_LIMIT)
  {
     shoulderPos = shoulderPos + speed;
     if(shoulderPos > HIGH_POS)
     {
        shoulderPos = HIGH_POS;
     }
  }
  shoulder.write(shoulderPos);
}

// control elbow - servo with A2
void moveElbow()
{
  int a2_input = analogRead(A2);  // read analog input pin A0
  if(a2_input < LOWER_LIMIT)
  {
    elbowPos = elbowPos - speed;
    if(elbowPos < LOW_POS)
    {
      elbowPos = LOW_POS;
    }
  }
  if(a2_input > UPPER_LIMIT)
  {
     elbowPos = elbowPos + speed;
     if(elbowPos > HIGH_POS)
     {
        elbowPos = HIGH_POS;
     }
  }
  elbow.write(elbowPos);
}

// control gripper - servo with A3
void moveGripper()
{
  int a3_input = analogRead(A3);  // read analog input pin A0
  if(a3_input < LOWER_LIMIT)
  {
    gripperPos = gripperPos - speed;
    if(gripperPos < LOW_POS)
    {
      gripperPos = LOW_POS;
    }
  }
  if(a3_input > UPPER_LIMIT)
  {
     gripperPos = gripperPos + speed;
     if(gripperPos > HIGH_POS)
     {
        gripperPos = HIGH_POS;
     }
  }
  gripper.write(gripperPos);
}
STRATEGY 2: Joystick sets servo target angle
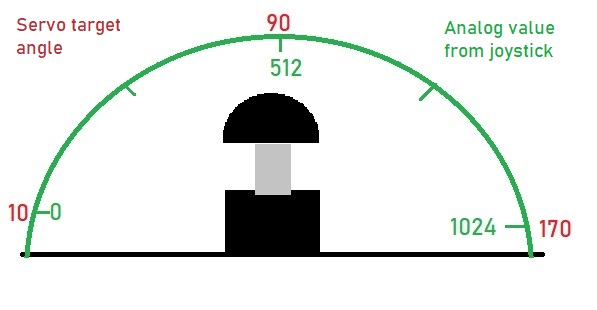
With this strategy, the current position of the joystick is converted directly into the target position of the servo. The analog values between 0 and 1023 are mapped to angles between 0 and 180. To avoid the extreme positions, only target angles between 20 and 160 degrees are used in my implementation.
Caution: when the joystick is released, the servos move back to the center position. With this variant, the position of the joystick must be kept constant in order to maintain a position over a longer period of time.
/* RobotArm
 * Direct Joystick Positioning
 * Stefan Hager 2023
 */

#include <Servo.h>

// limits for servo movement
#define LOW_POS 20
#define HIGH_POS 160

// create all required objects from class Servo
Servo base;
Servo shoulder;
Servo elbow;
Servo gripper;

// define start postions for yout joints
int pos_base = 90;
int pos_shoulder = 45;
int pos_elbow = 45;
int pos_gripper = 10;


int outputcounter = 0;
int readBase, readShoulder , readElbow , readGripper;

// Also connect the joystick VCC to Arduino 5V, and joystick GND to Arduino GND.

void setup()
{
  // set up serial port for output
  Serial.begin(9600);

  base.attach(9); // Attach base servo to pin 9
  base.write(pos_base); // Initial base servo position: 90° angle
  delay(500);
  shoulder.attach(10);
  shoulder.write(pos_shoulder);
  delay(500);
  elbow.attach(11);
  elbow.write(pos_elbow);
  delay(500);
  gripper.attach(12);
  gripper.write(pos_gripper);
  delay(500);
}


void loop()
{
  // read values from joysticks
  readBase = (readBase * 0.9) + analogRead(A0) * 0.1; // will be 0-1023
  readShoulder = (readShoulder * 0.9) + analogRead(A1) * 0.1;
  readElbow = (readElbow * 0.9) + analogRead(A2) * 0.1;
  readGripper = (readGripper * 0.9) + analogRead(A3) * 0.1;

  // map input to target positions
  pos_base = map(readBase, 0, 1023, LOW_POS, HIGH_POS);
  base.write(pos_base);

  pos_shoulder = map(readShoulder, 0, 1023, HIGH_POS, LOW_POS);
  shoulder.write(pos_shoulder);

  pos_elbow = map(readElbow, 0, 1023, LOW_POS, HIGH_POS);
  elbow.write(pos_elbow);

  pos_gripper = map(readGripper, 0,1023, 0, 90); //gripper pos between 0 and 90 degrees
  gripper.write(pos_gripper);

  // print positions
  printPositions();
  // make it a bit slower
  delay(10);
}

// printPositions: prints position of each joint in following oder:
// B: base | S: shoulder | E: elbow | G: gripper

void printPositions()
{
  outputcounter++;
  if(outputcounter < 30)
  {
    return;
  }
  Serial.print("B: ");
  Serial.print(pos_base);
  Serial.print(" | S: ");
  Serial.print(pos_shoulder);
  Serial.print(" | E: ");
  Serial.print(pos_elbow);
  Serial.print(" | G: ");
  Serial.println(pos_gripper);
  outputcounter = 0;
}