MQTT Basics and Setup
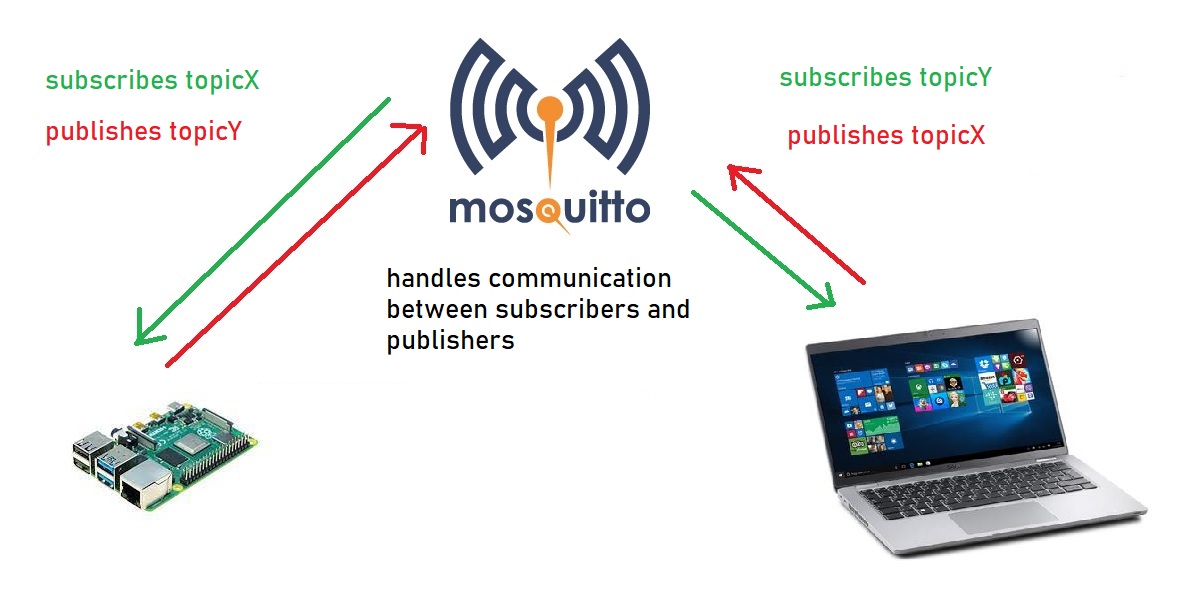
This tutorial is about a very simple data exchange between two computers with MQTT, in my example between a Raspi (Raspberry Pi 3+) and a Windows computer. Ultimately, however, this type of communication works between all devices for which a MQTT implementation is available. For the tutorial I use Python as programming language, but you could also have implemented the example in Java, C# or Javascript.MQTT (Message Queuing Telemetry Transport) is a lightweight open messaging protocol that was developed for constrained environments such as M2M (Machine to Machine) and IoT (Internet of Things), where a small code footprint is required. MQTT is based on the Publisher / Subscriber messaging principle of publishing messages and subscribing to topics. The sender (Publisher) and the receiver (Subscriber) communicate via Topics and are decoupled from each other. The connection between them is handled by a MQTT broker. The MQTT broker filters all incoming messages and distributes them correctly to the Subscribers.

Commuication Principle
MQTT is based on the Publisher / Subscriber messaging principle of publishing messages and subscribing to topics. In MQTT, the word topic refers to an UTF-8 string that the broker uses to filter messages for each connected client. The topic consists of one or more topic levels. Each topic level is separated by a forward slash (topic level separator).
myapplication/topic/subtopic/detail
In comparison to a message queue, MQTT topics are very lightweight. The client does not need to create the desired topic before they publish or subscribe to it. The broker accepts each valid topic without any prior initialization.
Chattool Communication

It doesn't matter where the MQQT broker is running, it only has to be accessible via TCP/IP. So you can run the broker on the Raspi, on the laptop or anywhere in the local network, you can even use test brokers on the Internet.
Mosquitto Setup
In this example, the broker runs on the Windows laptop. For Windows, the Mosquitto Mosquito MQTT broker is available, among others. You just need to download and install the mosquitto. To be able to use the Mosquitto on the local computer, some configurations have to be made. The problem is that for security reasons the Mosquitto accepts only local (from 127.0.0.1) and no anonymous connections in the basic configuration. To use it as a broker for the Raspi, the following changes have to be made in the file
mosquitto.conf
must be made: Enable port 1883 for any IP addresses.
# listener port-number [ip address/host name/unix socket path]
listener 1883 0.0.0.0
Allow connection without user (anonymous):
# Boolean value that determines whether clients that connect
# without providing a username are allowed to connect. If set to
# false then a password file should be created (see the
# password_file option) to control authenticated client access.
#
# Defaults to false, unless there are no listeners defined in the configuration
# file, in which case it is set to true, but connections are only allowed from
# the local machine.
allow_anonymous true
Now you have to start the Mosquitto from the command line as follows:
cd C:\Program Files or wherever your mosquitto got installed\Mosquitto
mosquitto.exe -v -c mosquitto.conf
Python Setup
For the programming part a python environment on the raspi and the Windows computer is required. If you don't have a mqtt api installed yet, that needs to be done now. I use the Eclipse - Paho implementation (paho-mqtt). If you don't already have pip installed on the raspi, you will need to do that beforehand as well. After that, you can use pip to install paho mqtt.
sudo apt-get install python3-pip -y
sudo pip3 install paho-mqtt